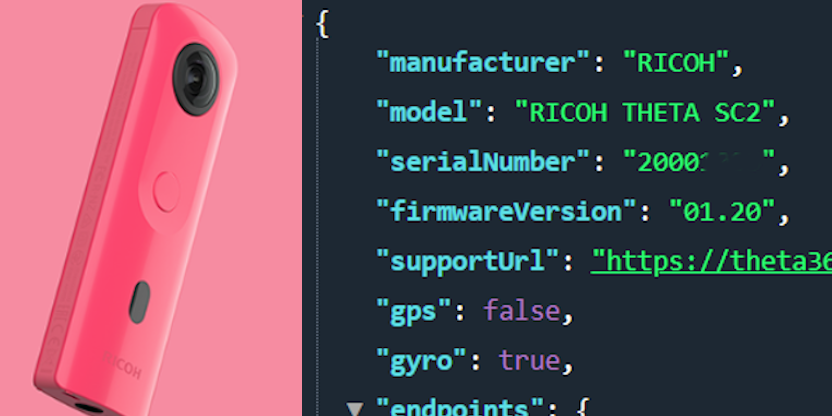
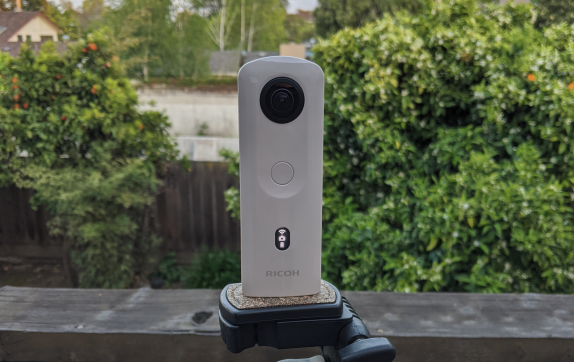
The RICOH THETA SC2 is a great, lightweight camera that takes good-looking 360° pictures. Many people in the developer community have asked about building applications for the SC2. Although the SC2 camera appears to conform to the RICOH THETA Wi-Fi API, it is not listed on the official RICOH API site which we all use as our reference. Some developers have reported problems with the SC2 and the RICOH THETA SDK. Other people have reported problems using the SC2 with the Google Streetview mobile app.
Camera support note: All models except m15 work with the API. However, there are minor differences between each model. This test is for the SC2. One important point about the SC2 is that it is using a slower MCU compared to the RICOH THETA V and Z1. The slower speed of the SC2 results in longer processing times for all API commands. This can cause significant problems if you run multiple API commands in sequence and do not check for completion of each command. There are extensive examples in this document and sample code that show how to use POST /osc/commands/status to verify that your previous API command is finished processing.
This article will clarify usage of the SC2 Wi-Fi API based on community testing.
Getting SC2 Sample Code and API Community Documentation
Please use the online form below to request for code samples and additional information.
Request For Information
You can also contact Oppkey by email at jcasman@oppkey.com <Jesse Casman> if you would like any of the following documentation:
1. explanation of how the SC2 API is different from the public API Reference (which does not list the SC2 as supported).
2. updated and extended SC2-specific API usage documentation that goes beyond this article
3. working repository of command line Dart code with many usage examples for the SC2 API commands
4. sample starter code for SC2 mobile app built with Flutter (which can compile into native iOS and Android)
API Testing Tools and Libraries
For the first set of tests, I am using THETA SC2 firmware 1.20 on a Windows 10 machine using the free API testing tool Talend API Tester. This API testing tool is similar to Postman. Another command line alternative is curl. If you prefer to write scripts for your tests, I find it easy and effective to use Python requests or any number of JavaScript libraries that can handle an HTTP request. This article makes extensive use of the Dart http package for both GET and POST requests.
Dart was chosen for many tests as it almost as easy to use as Bash or Python for command line scripts and provides a smooth and easy way to test mobile apps on iOS and Android with Flutter.
Connect Your Development Workstation to the SC2
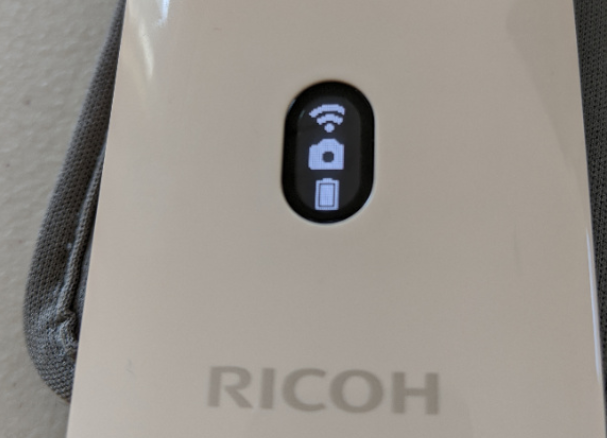
Turn the SC2 on and put it into Wi-Fi mode.
You must connect your workstation to the SC2 with Wi-Fi. The hotspot password is the serial number (just the numerical digits).
On Windows, click on the Wi-Fi icon in the lower-right of your screen. Select the THETAYP hotspot.
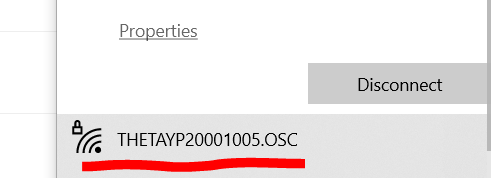
In this example, the password is 20001005. There are no letters or dots in the default password.
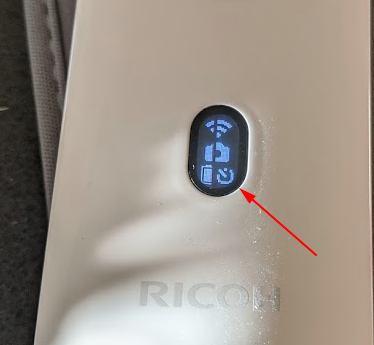
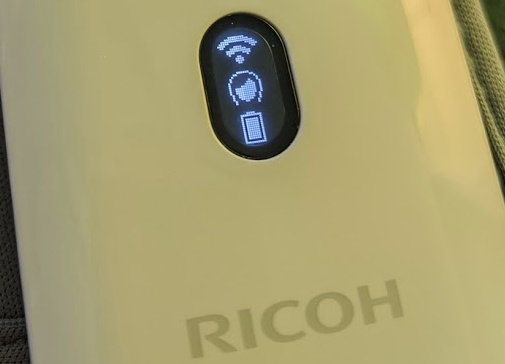
Once connected, the Wi-Fi icon on the front of the SC2 will be solid. If the Wi-Fi icon is still flashing, the camera is not connected.
Troubleshooting Connection
The THETA SC2 Wi-Fi only functions at 2.4GHz. The THETA V and the Z1 operate at both 2.4GHz and 5GHz. If you have an unstable Wi-Fi connection with the SC, try a different Wi-Fi dongle or laptop to isolate the problem.
If you are working with multiple devices, make sure you are connecting to the correct camera.
Put the camera right next to your development workstation. Moving the camera 5 feet away can make a difference.
Turn off other Wi-Fi routers in the test area that may be causing Wi-Fi interference.
If you have two network interfaces in your development workstation, make sure that your primary router is not at 192.168.1.1. The THETA SC2 will always be 192.168.1.1 in Access Point (AP) mode. If this is a deal-breaker for your testing, go to the forum and search for methods to use Client Mode or ask a question.
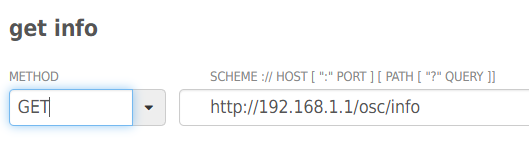
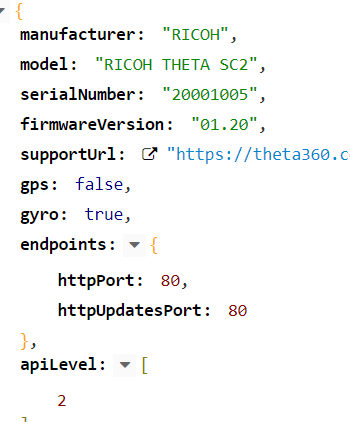
Check API Access with "info"
Use the simplest possible API command first to make sure your workstation can talk to the camera with HTTP. Send a GET command to http://192.168.1.1/osc/info
You can also run the GET command in your browser.
You will see this response.
This is a test using Google Chrome.
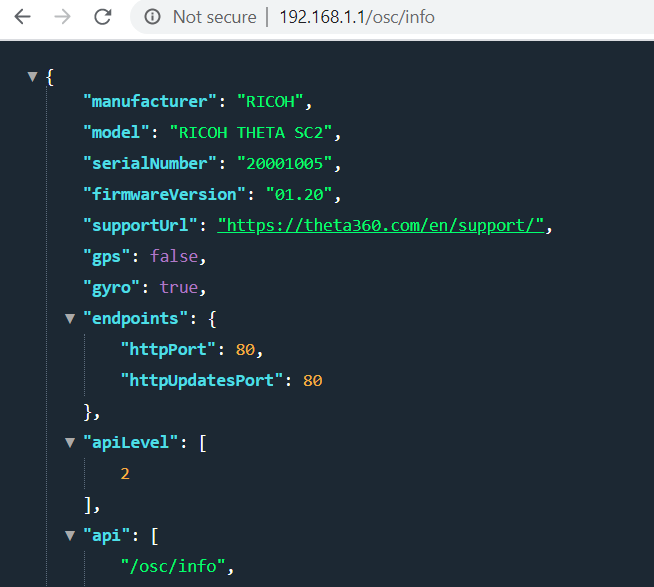
(Chrome displays colored highlighting for me because I am using the free extension JSON Awesome.)
The rest of this tutorial will focus on POST commands. For that reason, you will need to use an API testing tool.
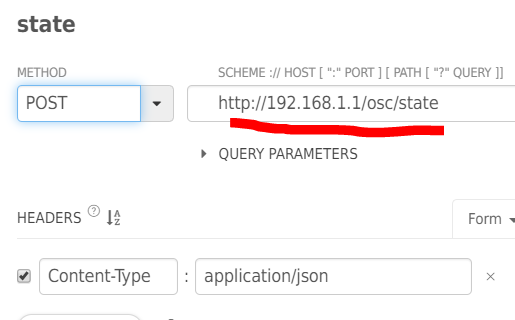
Check "state"
The simplest POST command is state. Make sure that you use POST and not GET. Note that the header is Content-Type: application/json. You need the HTTP header for most of the THETA SC2 POST commands. It's a good practice to include it.
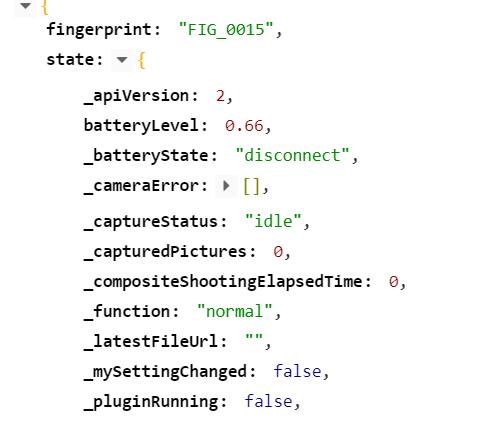
The response is below. You can see that we're able to grab lots of useful info from the state, including the battery level, and the last picture taken (_latestFileUrl). My battery is at 66% and I'm going to charge it.
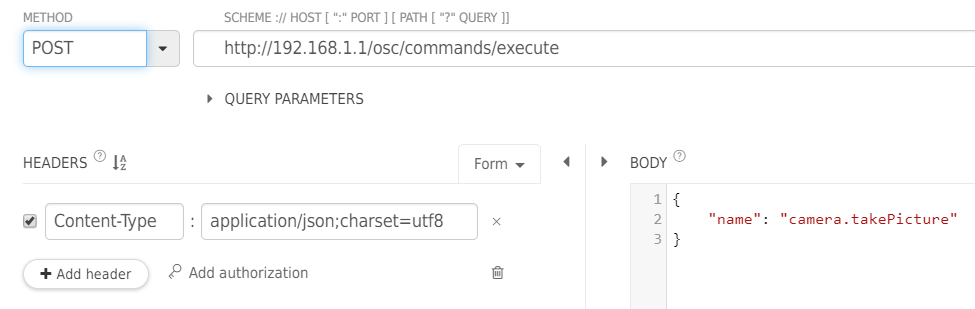
Take a Picture
Finally, we get to the exciting part. We have a camera. Let's take a picture. It's time. :-)
Closeup of the end-point.

Closeup of the payload.
Celebrate the Camera Chirp
The camera will now chirp when the take picture command is run. Developers like the chirp because it's associated with a successful outcome of your program. In the future, you can trigger the picture with object recognition or external sensors. However, for now, take a moment to celebrate the chirp.
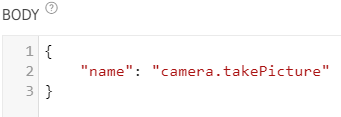
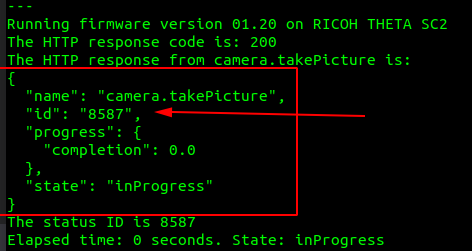
Response from takePicture
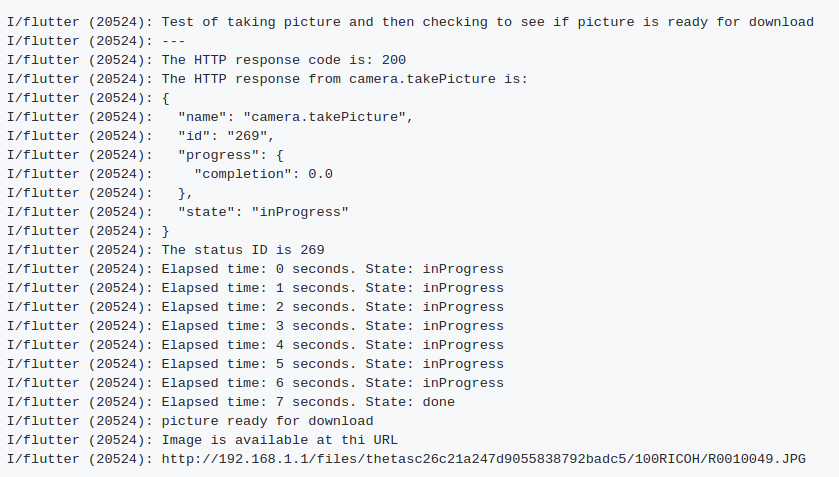
Disappointingly, we can't see the picture directly in the takePicture response. We're close, so just hang on for the next step. For now, pay attention to state value that you get in the response. Notice that it says, "inProgress." This is important because you'll next need to check to make sure the camera has finished processing the image before you can download it.
Check State with POST "/osc/state"
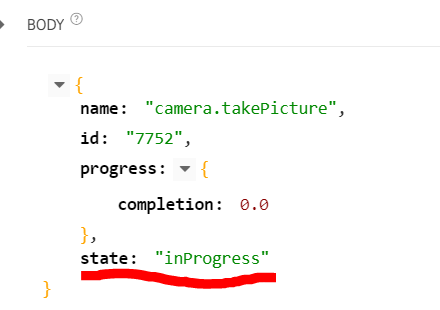
Repeat the POST example for "/osc/state" explained earlier in the document. As you've just taken a picture, your response will now show the _latestFileUrl. Use that to grab the file. You can open it in a browser. Pay attention to the _captureStatus value. I'll explain this in the next section.
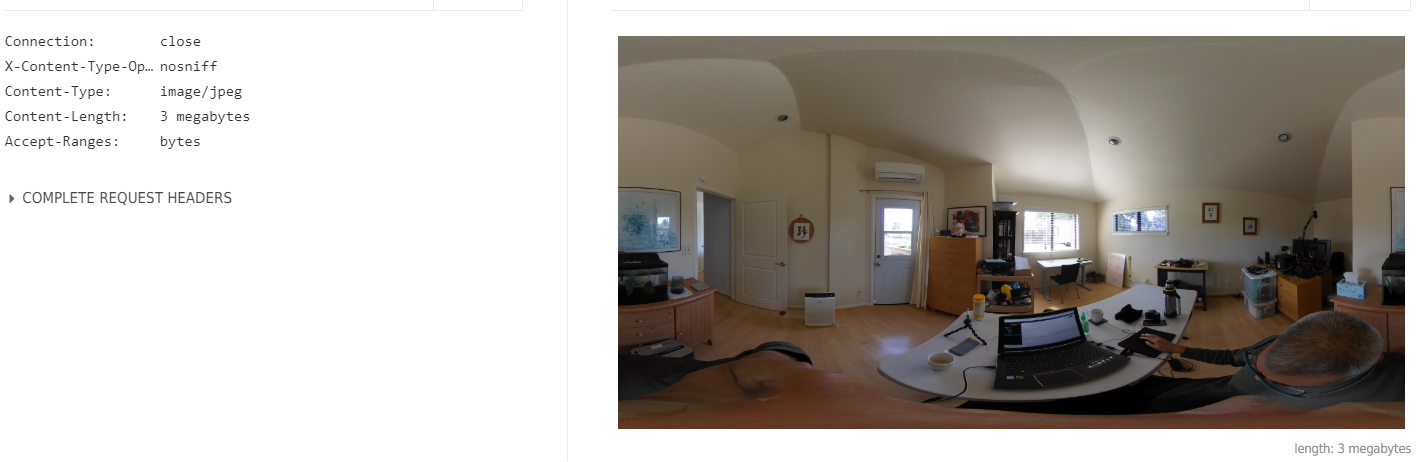
In the example below, I am using an API testing tool to get the image. However, you can also test this in a web browser. The file is in equirectangular JPEG format.
Important Note about _captureStatus and Downloading Images
The SC2 appears to take quite a bit longer to be ready for the next picture shoot. The V/Z1 is faster in my experience. When you write your own program you should check _captureStatus with state to make sure the _captureStatus is idle.
The flow of your program will be as follows:
<--- camera.takePicture
----> response
<--- POST /osc/state
----> response _captureStatus: shooting
<--- POST /osc/state
----> response _captureStatus: shooting
<--- POST /osc/state
----> response _captureStatus: shooting
<--- POST /osc/state
----> response _captureStatus: shooting
<--- POST /osc/state
----> response _captureStatus: idle
<--- GET URL *URL = _LatestFileUrl of the state received immediately before
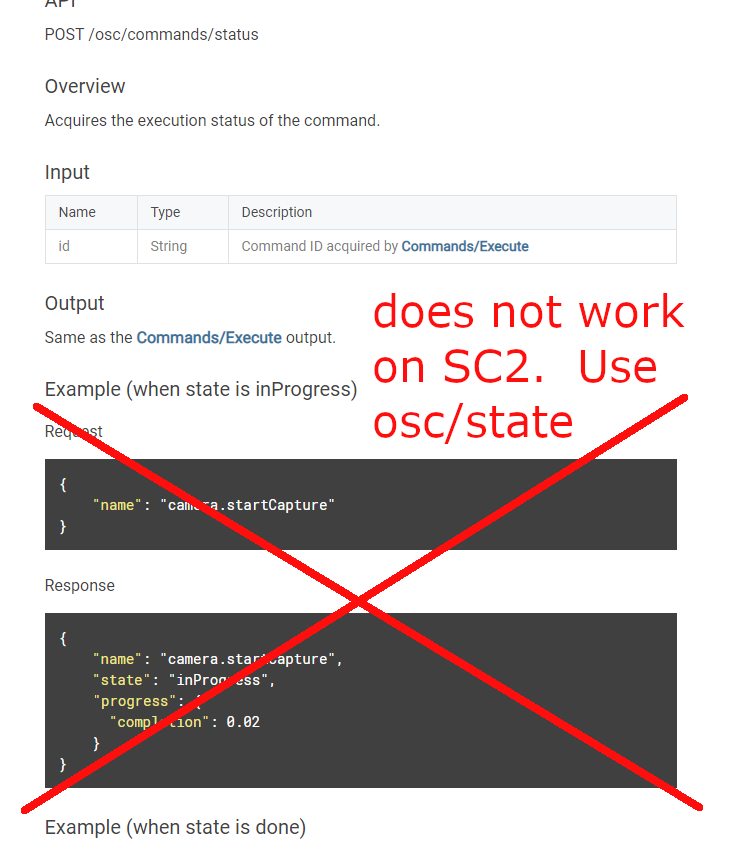
Using /osc/command status
I used a network protocol analyzer on both the RICOH mobile SDK and the official mobile app to see how these apps check for the readiness of the image to be download. Both apps are using status.
Using status, the steps are:
1. takePicture
2. check on status of takePicture using the state property.
3. if status shows state as inProgress, repeat check
4. If the status shows state as done, get the URL of the laste image taken
5. download file and save to disk.
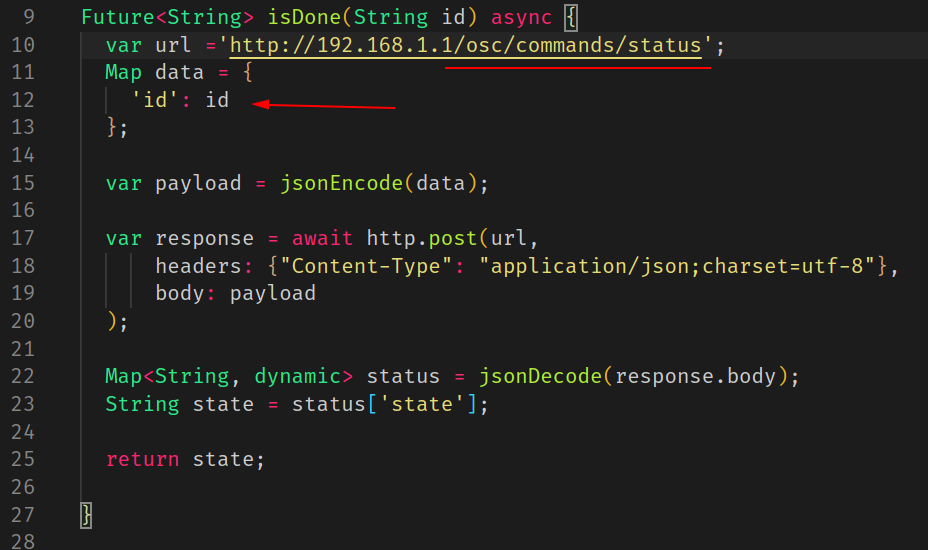
To use status, you must get the id of the /osc/command from the HTTP response of takePicture.
Once you have the id, you can pass it to status.
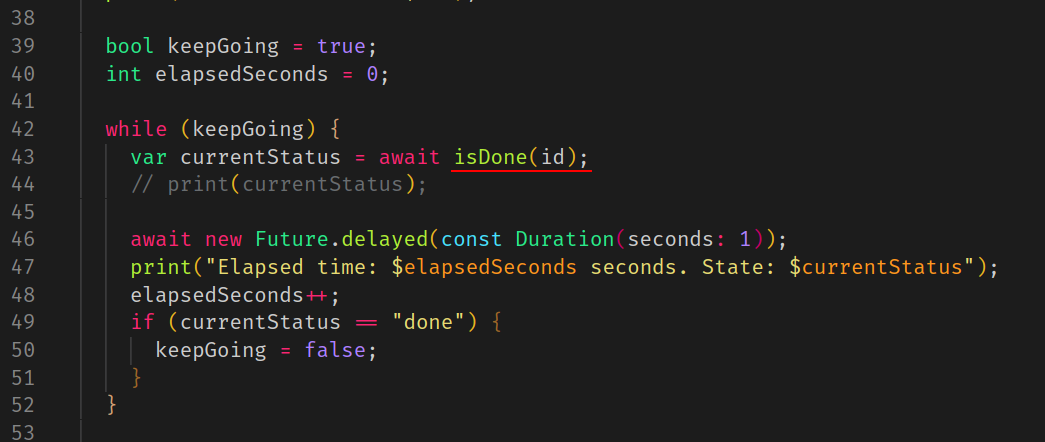
Now, put the check on the status in a loop with a delay in the loop to avoid overwhelming the camera and your logs.
Here's an example of putting a delay of 1 second into the loop.
Full code example is available.
An example of checking to make sure the file is ready for download and then downloading the file is available.
The method of saving the file to your local workstation and to a mobile device is probably going to be different. Here's an example getting the _latestFileUrl from /osc/state, then writing the bytes with the Dart File.writeAsBytes method.
Programming Tip
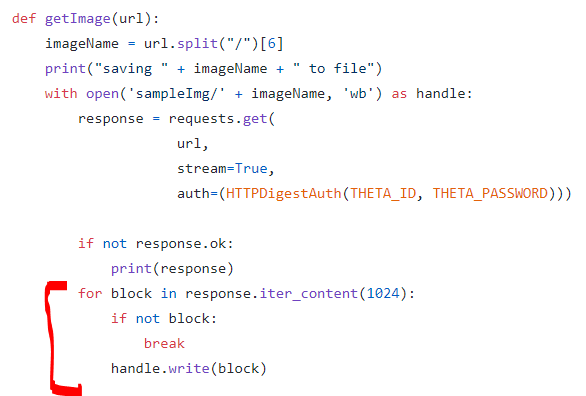
Most languages such as Java, Python, JavaScript have libraries to save a file stream from a URL to permanent local storage. In Python, it is just a few lines. When you make the GET request, your HTTP library may require you to specify that the response is a stream. When you save the THETA image, you may need a loop to save the file as a set of blocks. An example for Python is below. Saving a file from an HTTP stream is a common operation with most languages, so just search for examples on Google or StackOverflow for your specific programming language.
startCapture for Bracketing Images
Community member timbit123 identified a problem using /osc/commands/status to check the completion of start capture.
See his post here.
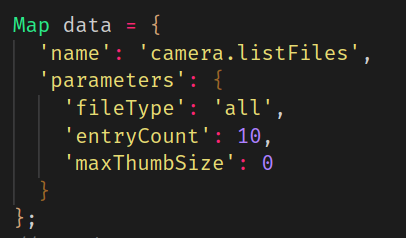
Listing Files
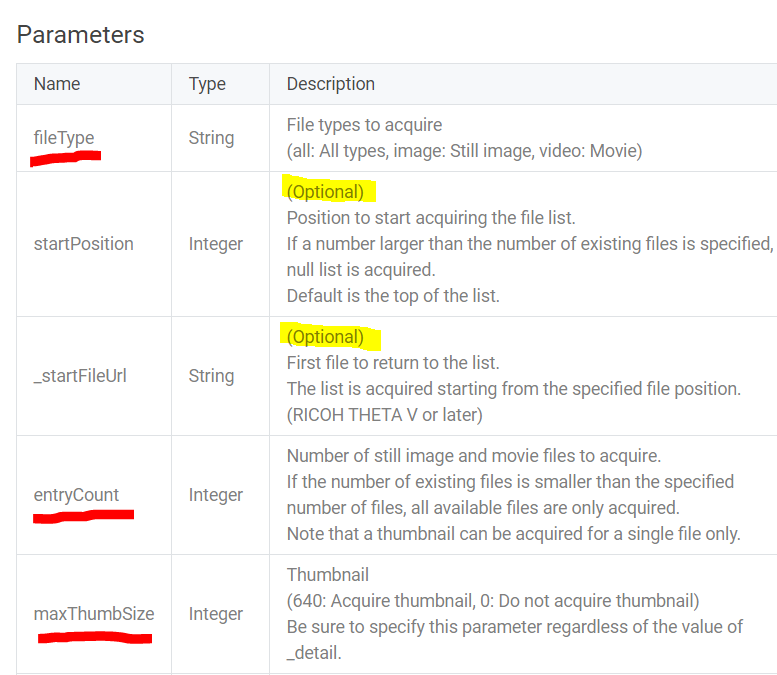
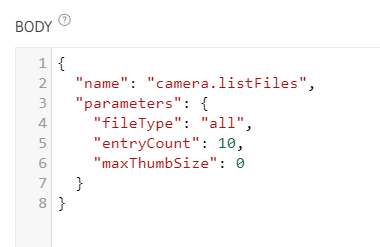
First, great job on taking a picture and downloading it to your computer with a GET command. Now, let's tackle a slightly more complex POST request with parameters in the payload. We'll list the files. Look at the API below and identify which parameters are optional and which are required.
https://api.ricoh/docs/theta-web-api-v2.1/commands/camera.list_files/
Let's focus on the required parameters. I've underlined the "required" parameters in red.
Structuring the Request
In the example below, all the parameters to the left of the colon are enclosed in quotes. For example, use "fileType", not fileType. To the right of the colon, the numbers are not enclosed in quotes. Use 10 not "10".
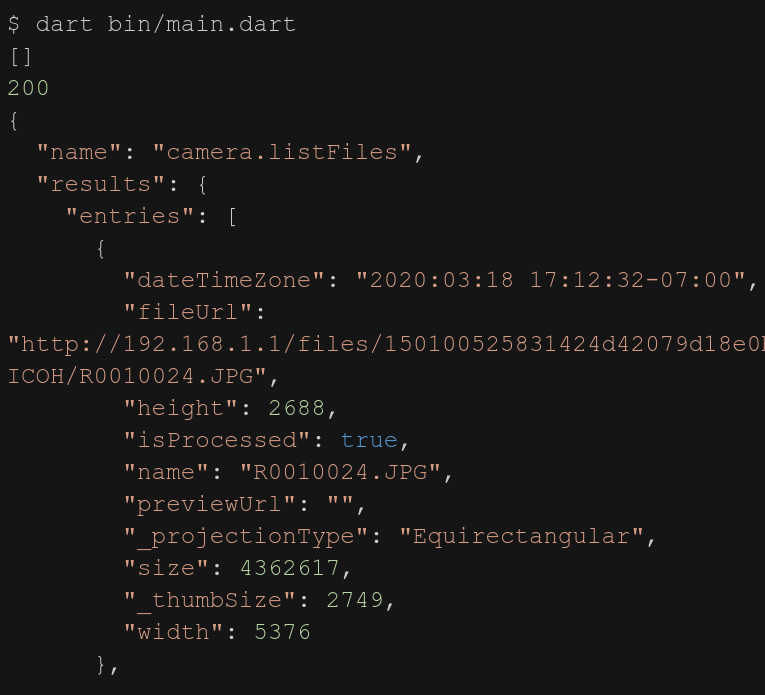
Getting the Response
This is a collapsed view of the response. I only have 3 images on my THETA SC at the moment.
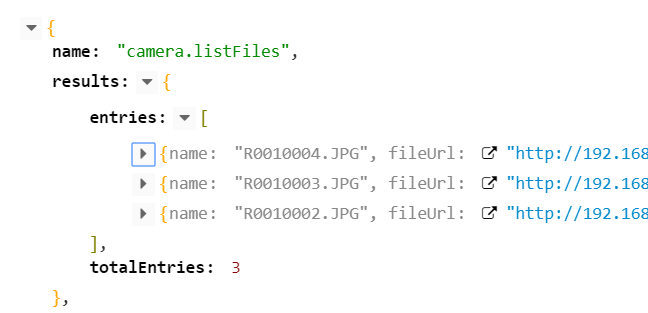
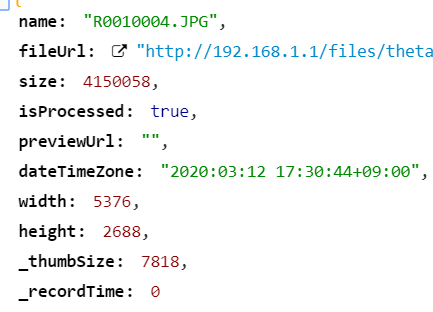
Expanding an entry in the array, you can see the useful data you're getting back.
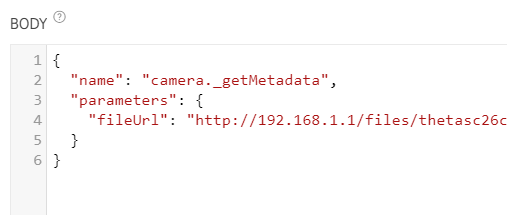
Inspecting Image Metadata
At this stage, you may want to just download all the images and process all the images on the mobile device or in your cloud.
Programming Tip: If you want to grab the image metadata on your Android mobile phone, you can use Android ExifInterface
I believe most developers grab all the images. However, if there are hundreds or thousands of images on the camera, you may want to pull more data from images prior to processing.
In my tests, I was only able to get a portion of the metadata with the API on the SC2. Run the test yourself to see if you can get anything useful.
Response
LiveView Motion JPEG
On the official RICOH mobile app, there is a live preview of the scene before a picture is taken.
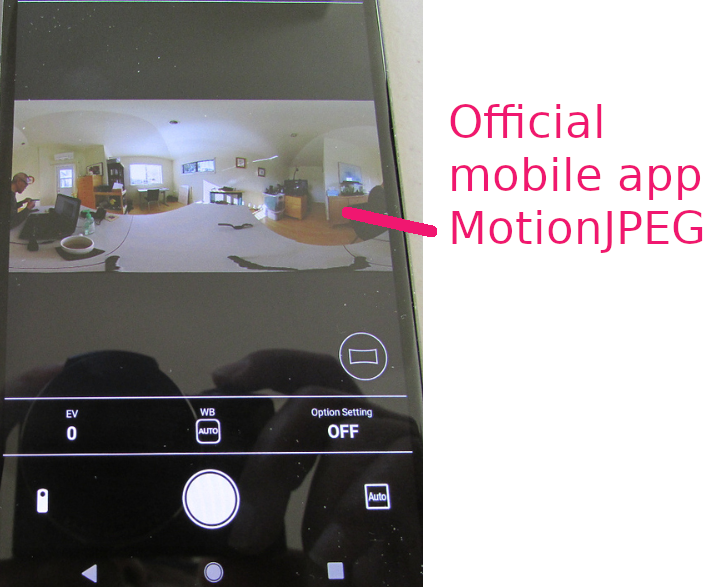
This is a motionJPEG stream. You can get the stream into your own application for preview with this API.
https://api.ricoh/docs/theta-web-api-v2.1/commands/camera.get_live_preview/
To test the API, I used the open source Amelia Viewer for RICOH THETA by Jake Kenin. GitHub repository.
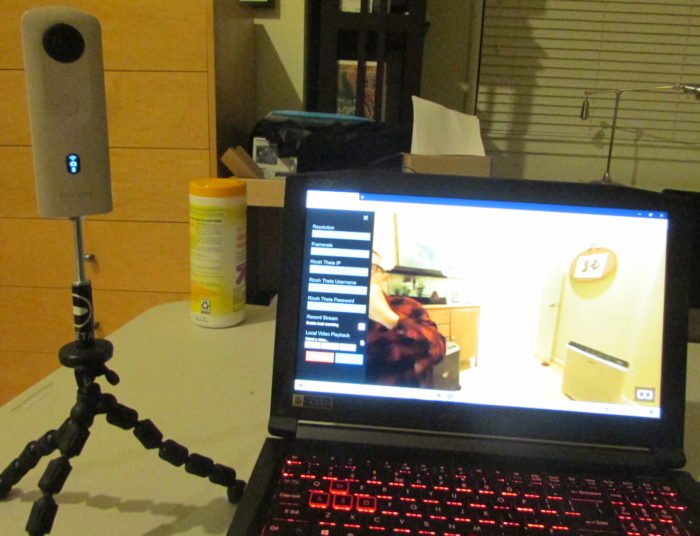
The stream worked without any problems. In Firefox, I'm using A-Frame to handle the navigation in a normal 360 view.
Pre-compiled binaries for Windows 10 and Linux are here.
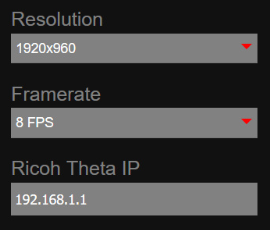
I am using a stream of 1920x960 by 8 FPS
Binary data of live view (MotionJPEG).
Binary data is transferred as Content-Type: multipart/x-mixed-replace.
Main code example is here:
Function for get live preview is here:
A stripped down example of displaying the MotionJPEG stream is here:
Another excellent source of information on MotionJPEG is this plug-in from the skunkworks club.
Note that the THETA SC2 cannot use plug-in technology. However, other parts of the article are relevant.
SC2 Wi-Fi Tests with Dart
These tests done with firmware 1.20.
Code examples are available for download. Please contact us.
info
Get info is the simplest
  String url = 'http://192.168.1.1/osc/info';

  var request = await HttpClient().getUrl(Uri.parse(url));
Response

state
The request
void postState() async {
  var response = await http.post('http://192.168.1.1/osc/state');
  prettyPrint(response.body);
}
The response

take picture
In the example below, pay attention to the body. It needs to be encoded as JSON. Your HTTP library may do this for your automatically. Also note that I am specifying the header as "Content-Type": "application/json;charset=utf-8". Although this example shows async/await, it should work without async io.
Future<http.Response> takePicture () async {
  var url ='http://192.168.1.1/osc/commands/execute';
  Map data = {
    'name': 'camera.takePicture'
  };

  //encode Map to JSON
  var body = jsonEncode(data);
  var response = await http.post(url,
    headers: {"Content-Type": "application/json;charset=utf-8"},
    body: body
  );
  print("${response.statusCode}");
  prettyPrint("${response.body}");
  return response;
}
Response from THETA SC2.

List Files
Payload
Response
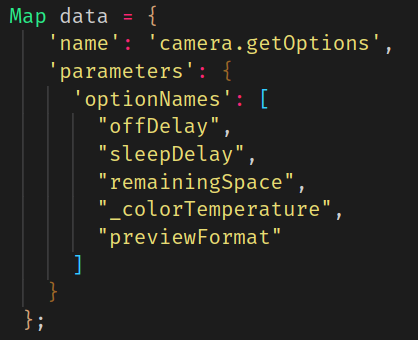
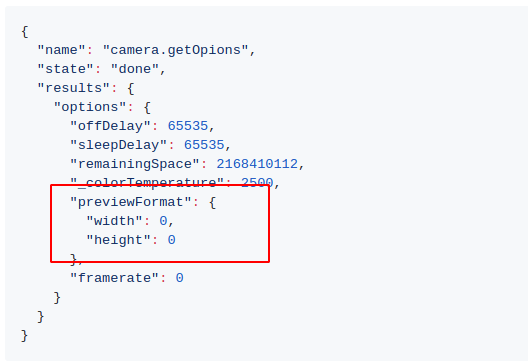
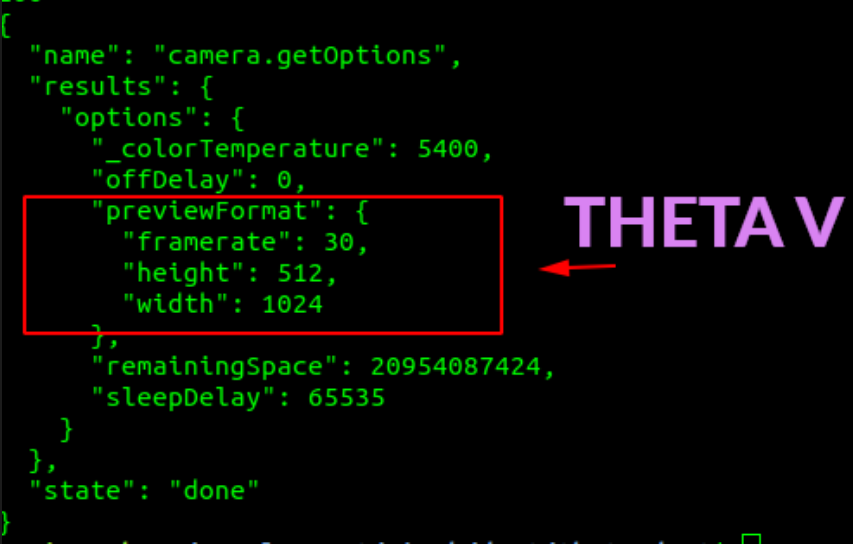
get options
Download File
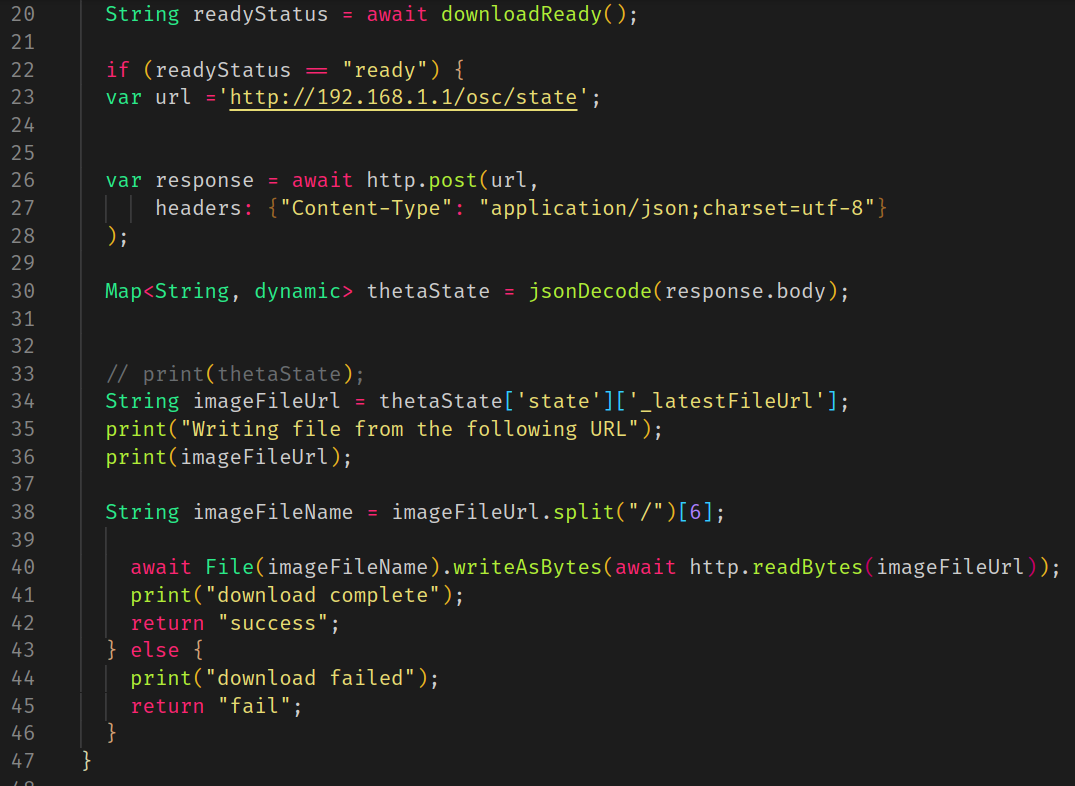
The image file must be saved as bytes.
await File('ricohThetaImage.jpg').writeAsBytes(await http.readBytes(imageFileUrl));
Map<String, dynamic> thetaImage = jsonDecode(response.body);

String imageFileUrl = thetaImage['results']['entries'][0]['fileUrl'];
I'm getting the name of the image file by parsing the URI.
String imageFileName = imageFileUrl.split("/")[6];
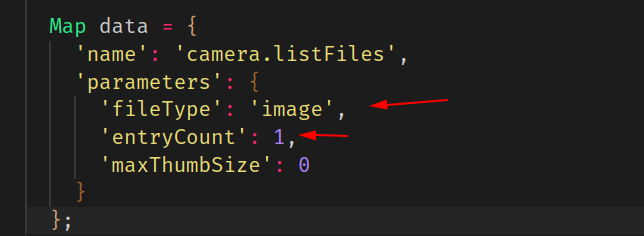
I also made these changes to the list files options.
I'm only listing the image files and I'm only listing one file.
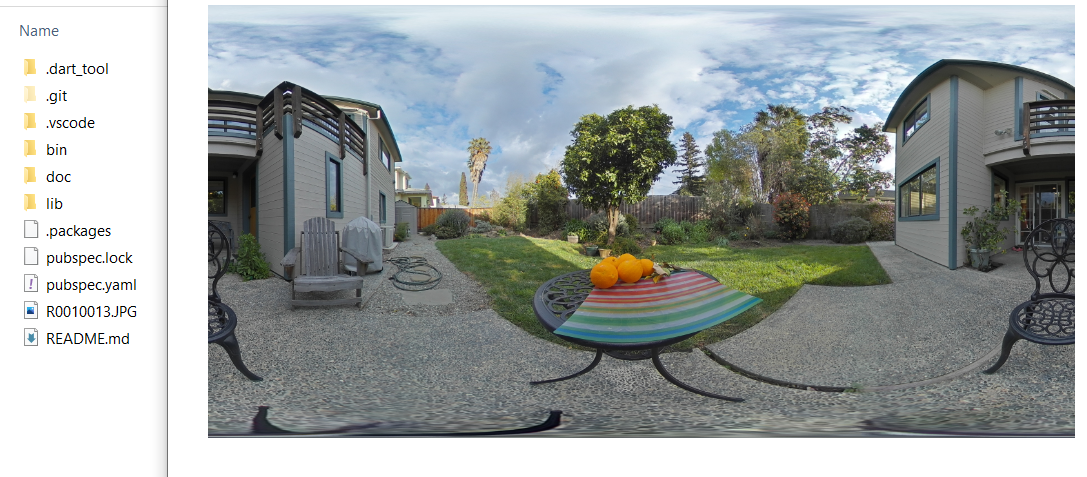
This is a THETA SC2 image that I downloaded with the script.
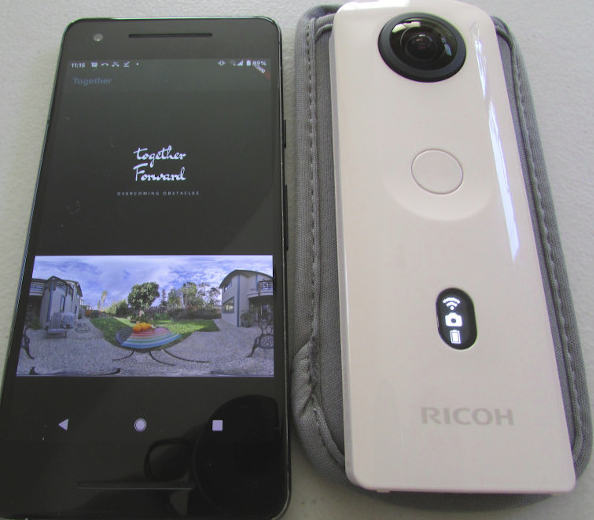
This is a test pulling the image to a Google Pixel 2 running Android 10.
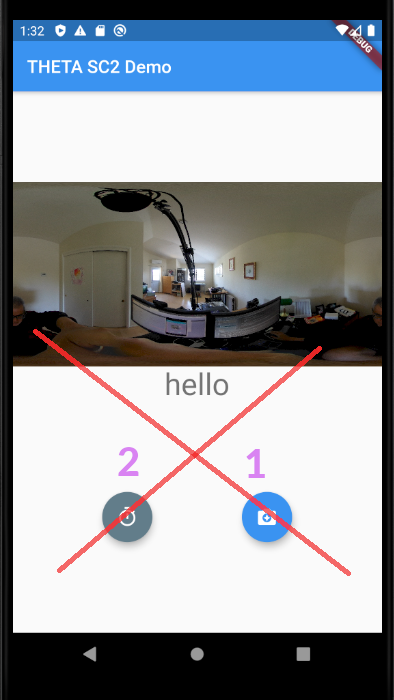
If you're using Flutter with Dart, it is very easy to get the images from the RICOH THETA SC2 and display them on your mobile app.
Image.network("http://192.168.1.1/files/thetasc26c21a247d9055838792badc5/100RICOH/R0010013.JPG",
  fit: BoxFit.fill,
The dart scripts can be put directly into a Flutter application for Android or iOS.
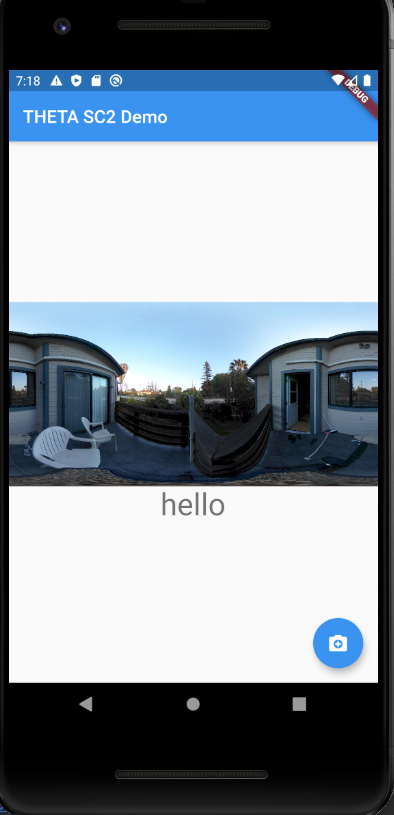
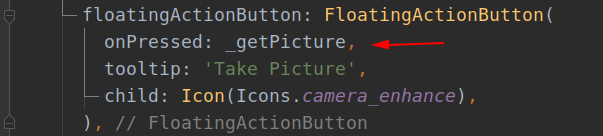
Attach button onPressed to method.
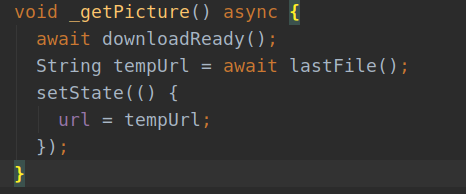
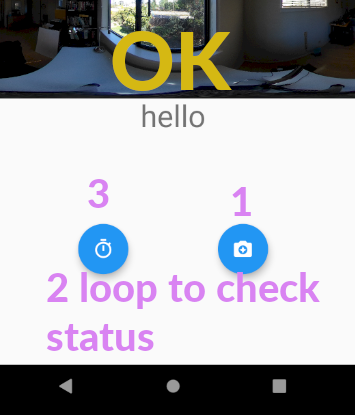
The Flutter screen is redrawn with the setState() method. This is similar to React or other toolkits that provide a state manager to only redraw a certain widget or component.
Before you run setState, grab the URL of the image you just took using async / await. If you don't wait for the image to be processed, you won't have the URL for the image when you redraw it on the screen. Remember that downloadReady() contains a loop to check on the status of image processing. When the image processing is "done", then downloadReady will return the URL of the file.
Hardworking SC2 connected to the Flutter app with Wi-Fi.
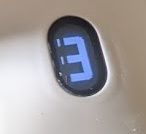
Self-Timer
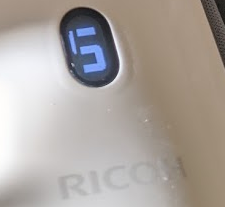
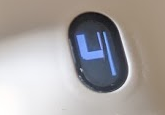
The SC2 has a nice monochrome LED display on the front that can display the self-timer mode.
Once you trigger takePicture, the camera displays a nice large number countdown.
This example sets the exposure delay to 5 seconds. Note that 5 is a number, not a string (there are no quotes).

To turn off self-timer delay, set the value to 0 (zero).
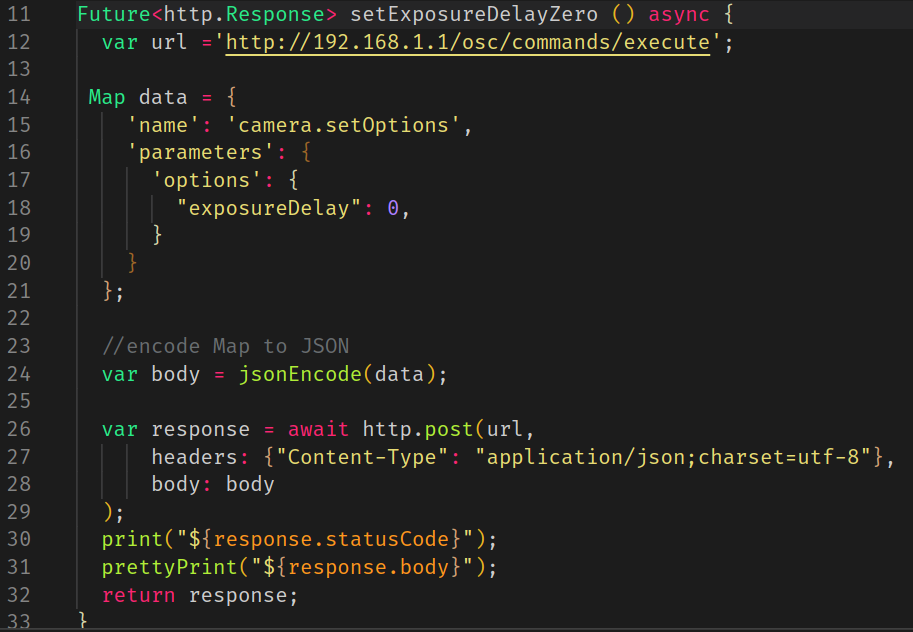
This was tested with a RICOH SC2 using firmware 1.20
Troubleshooting Set Timer Delay and Other osc/command
If takePicture or /osc/commands/execute - exposureDelay do not work, it may be because the camera has not finished processing the previous command. For example, if your mobile app relies on the user to set the self-timer delay with a button, then you can't just have the API call in sequence after they take a picture.
You must set up a loop to check on the status of the osc/commands/execute before you set exposureDelay. You will need something similar to the code below to check to make sure the camera is ready to accept another command.
Future<String> isDone(String id) async {
  var url ='http://192.168.1.1/osc/commands/status';
  Map data = {
    'id': id
  };
  var payload = jsonEncode(data);
  var response = await http.post(url,
      headers: {"Content-Type": "application/json;charset=utf-8"},
      body: payload
  );

  Map<String, dynamic> status = jsonDecode(response.body);
  String state = status['state'];
  return state;
}
presets
Code examples, snippets and explanation are available from jcasman@oppkey.com
The SC2 and the SC2 For Business Come with a number of presets. The face preset will detect a person’s face and adjust it to the center of the image
In nightView, the dynamic range of the bright areas are expanded to reduce noise and if a person’s face is detected, it will be enhanced.

The SC2 for Business has room mode and time shift.

RICOH THETA SC2 API Community Test Updates for June 2020
Our June community update highlights two API tests from community members which show differences between the APIs for the SC2 and the THETA V.
- getMetadata does not work as expected on the SC2
-
/osc/commands/status and osc/state behave differently on the SC2 and V/Z1
_getMetadata behavior - retrieving exposure values from THETA SC2 using RICOH API
Key takeaways:
- The RICOH API for the SC2 has a few issues. Significantly, the “getMetadata” call does not return the correct image exposure data.
- If you want to check the correct exposure then you can use ExifTool to view the metadata of an image file
- The RICOH API for the ThetaV works fine! The “getMetadata” call returns the correct image exposure data
THETA SC2 (Firmware Version: 01.31)
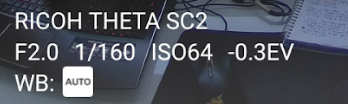
Adjusted the exposure to -0.3EV from the mobile app and took a picture
Ran “dart bin/main.dart getMetadata” from example code bundle for this API https://api.ricoh/docs/theta-web-api-v2.1/commands/camera._get_metadata/
Code snippet is below.
|
var url ='http://192.168.1.1/osc/commands/execute'; |
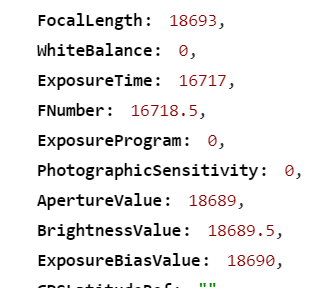
- The API returned a “NULL” value. Also note that the “Model” and “Software” values are missing.

Using ExifTool I was able to look at the metadata from the raw image file
- I found that the raw image contained the correct exposure metadata of -0.3

The takeaway is that the SC2 API has some issues. It does not return the correct image exposure metadata information. However, the correct metadata is stored in the image file.
THETA V (Firmware Version: 3.30.1)
Ran “dart bin/main.dart getMetadata” from the example code zip file.
API: https://api.ricoh/docs/theta-web-api-v2.1/commands/camera._get_metadata/
- Initially, the ExposureBiasValue is set to zero

Then, I adjusted the Exposure value to 1.3 from the official mobile app

Finally, I used the API to make sure that the value was consistent. Success!
I wanted to test changing the exposure compensation using the RICOH API (rather than through the mobile app). I changed the ExposureBiasValue with the API to 2

Finally, I looked at the metadata with the API. ExposureBiasValue = 2. Success!
THETA Z1 (Firmware Version: 1.40.1)
I set the exposure compensation to 1.0 using the RICOH API

After taking a picture I received the metadata using the RICOH API call “getMetadata”
- The exposure value was 1.0. Success!

/osc/commands/status behavior
Community member timbit123 highlighted a problem when using /osc/commands/status to check camera readiness after using startCapture. The solution is to use /osc/state to check camera readiness after using startCapture on the SC2.
